Teaching the Osage Indian Murders

This post describes one of the real historical mysteries discussed in our latest book, History’s Mysteries. This book includes 40 unsolved mysteries from history. Students read a text, discuss and analyze, do research on their own, and then complete a serious of projects designed to help them figure out what they think happened and why. In the process, they use critical thinking skills, academic research and writing skills, and get caught up in a fascinating story of intrigue! Read about the Osage Indian Murders and download a free unit teaching the Osage Indian Murders to try in your classroom!


The Osage Indian Murders or The Reign of Terror

One of the America’s most devastating unsolved historical mysteries involved oil, corruption, intrigue, over 100 murders and helped give birth to the FBI. And chances are you never heard a word about it, until now!

The Osage Indian tribe, like many Native American tribes had been forced off their native land and sent to a reservation, travelling the Trail of Tears to Kansas. However in due time, the US government again wanted to force the Osage off this land so they could develop the Midwest.

A map of Oklahoma showing the locations of the Native American reservations in present day

Coming to Oklahoma

In 1870 the tribe decided to buy dry and rocky land in Oklahoma. Their reasoning was that no one would want this land. No one would force them off of it. Life in Oklahoma was indeed hard. So it seemed an ironic, but well-deserved, blessing when oil was discovered on Osage land in 1894. The tribe decided to give headrights, the right to own and profit off the land, to all landowners. They paid a percentage of profits from the oil to everyone living on the reservation. This helped to enrich the whole tribe.

The richest people in the US

And there was quite a bit to go around! Checks given out to each member three times a year grew from $100 to $1000 ($13,000 in today’s money) to even higher as more oil was discovered and drilled. In 1923, alone it is estimated the tribe earned $30 million. That is the equivalent of $400 million today, making the members of the tribe the richest people on Earth! Unfortunately, that kind of money can bring a lot of problems.

Among other things, America was in the middle of The Great Depression, so people were envious of the Osage (But admired the Rockefellers and Gettys and white oil barons)! Under the guise of protecting the Osage, the US Congress passed a law that each Osage (50% or more of ‘native blood’) needed a court-appointed guardian. These guardians were usually white outsiders and they had total control over the money. The looting began immediately. Dozens of guardians were charged with corruption, but settled outside of court. Millions of stolen dollars were held by the guardian system and not returned!

President Coolidge meeting with members of the Osage tribe in 1924

The Reign of Terror


Then the killing started! In short order, 18 Osage and 3 outsiders were found dead, many connected to the first victim, Anna Brown. Brown’s mother had died so ownership of her estate was in limbo! At first, authorities called the deaths accidental, but it soon became clear that they were not. Local and state officials could not solve the murders or the web of fraud surrounding them! Possible the police were in on some of the corruption themselves.

So the tribe reached out to a new federal law enforcement branch, the FBI. At the time, this agency was called the Bureau of Investigations. It had little power or prestige. Their undercover operation investigating the Osage Indian murders helped put them on the map. They uncovered a web of contracted killings designed to eliminate members of the Osage and get their money! But many murders were never solved!

Can your students pick up where the FBI left off?

Download our free unit teaching the Osage Indian Murders below on Teacher Pay Teachers and try it out in the classroom!


Why use historical mysteries to teach English?

  • Real historical mysteries are popular and engaging. There’s a reason that there are so many shows about them. Students are going to be motivated to read and discuss them, maybe be the one to solve the unsolved!
  • When students study history, they are discussing events, using language to talk about cause and effect, order of events, pre-existing circumstances. And they are also expressing opinions and levels of certainty, all key language
  • Analyzing a real unsolved mystery teaches key critical thinking, research, and analytical skills, important for academic work or civil life.

Check out the full lesson plan teaching the Osage Indian Murders.

:

A full unit with vocab exercise, warm-up questions, a reading, discussion questions, a history quiz, and writing and research projects.

Buy the whole book: History’s Mysteries

40 historical mysteries from all over the world covering a broad range of topics: unsolved crimes, strange disappearances, otherworldly events, conspiracies, strange ancient buildings!

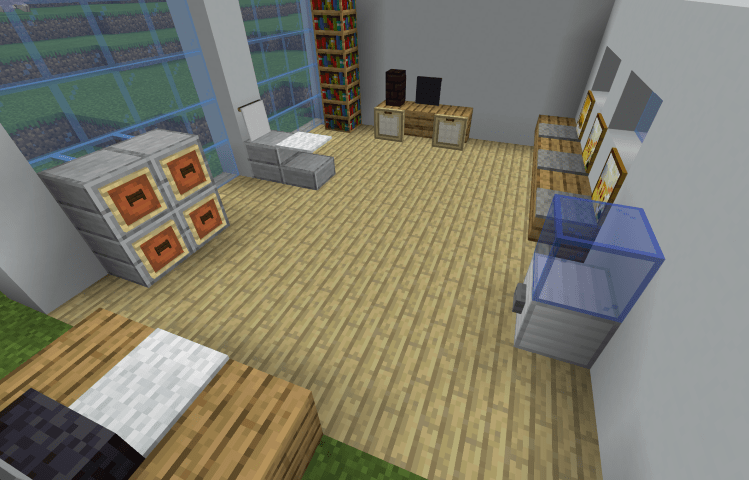
Easy Office Furniture in Minecraft

I don’t know why it’s satisfying to modern buildings and offices in Minecraft. You’d think we’d be tired of offices and want to use Minecraft as escapism. And the medieval castle urge is strong. But every now and then it’s fun to see if you can a modern workplace, including office furniture in the game.

So here are some ideas for making your office look good, including easy ways to make computers, desks, printers, bookcases, and file cabinets. You can use them in Minecraft skyscrapers, cities, or even your house! I’ve tried to avoid techniques that are too complicated so that kids can enjoy them (and some techniques involve pushing armor stands with pistons, which works in Java but not in bedrock anymore). So I’m keeping it simple! I’m also keeping my language simple for kids!

Share your own ideas for office furniture in Minecraft in the comments or even show how you used my ideas here!

Chairs

A Polished Stone Stair an Oak Wood Stair, and a Polished Quartz Stair

An easy way to make a chair is to use a stair. Try different kinds of stairs. Each one looks different. Wood stairs look like wooden chairs. Warped fungus and Crimson fungus are very colorful. Stone stairs can look like metal. Smooth Quartz stairs look like plastic. Those are the most modern, in my opinion. You can add signs to the sides of the chairs. That makes it look like an armchair!

Desks

A modern desk in Minecraft with three oak blocks and two birch trapdoors.

An easy way to make a desk is to put down three wooden or stone blocks. I think the wooden blocks look nice. You can try different colors. Stone block can look like metal. You can even use wool blocks or concrete blocks to make your office colorful.

Attach trapdoors to the sides of the blocks. They look like drawers or cabinets. Pretty nice, right?

Upside stairs make a nice desk or counter. Make it long or short. Add corners if you want.

Another way to make a desk is with upside down stairs. You can make a long worktable next to a wall like this. Many offices, libraries, and schools have this kind of counter. To place stairs upside down, you have to aim carefully. Make the cursor (+) point at the top of the blocks behind the desk.

You can also add two sideways stairs to the end. Now it looks a lot more like a long desk. Putting a stairs sideways a bit tricky too! You have to stand in front of your desk, turn to the side, and aim the cursor (+) at the top corner of the wall next to the desk. See if you can do it!

Nice work table or desk in Minecraft

Check out our latest Minecraft blog posts!


Computers

An easy way to make a computer is to add a banner to a desk. Black, white, or grey banners look the most like computers.

Where to place a banner to make a computer screen

Banners take up two spaces. The trick is to show only the top half of the banner. To do that, place a banner in the space above and behind the middle of the desk, right where that square is. If you do it right, it’ll look like a computer screen or monitor on top of the desk. Are you good with looms? You might be able to create a pattern on the banner that looks more like a monitor!

Want to have a desktop computer or tower? Many of the white, black and grey walls look like computers if you place them on top of desks. I like the Blackstone Wall or the Diorite Wall.

painting plus carpet equals laptop

To make a laptop, put a piece of grey, black, or white carpet on the top of your desk. Then on the wall behind it, add a painting. Now when you put a painting on a wall, it will fill up the space. So if you place a painting on a big wall, it will make a big painting.

For your laptop, you want a painting that is one block big. So you need to have a wall that is one block big. You can do this before you build the rest of the wall. Or destroy part of the wall every time you make a laptop. Then rebuild it.

Printer

Here’s an idea for an office printer. Make a stack of two stone slabs.

Then add a white banner behind the stack, as we did for the desktop screen above.

Put a slab in front of the stack and add a white carpet above that slab! Looks like one of those big copy machine/printers now, right?

Other Office Furniture for Minecraft

You can also make a file cabinet. Make it out of stone slabs or wooden slabs or even iron blocks. This one is eight slabs tall and two slabs wide. Add item frames on the front. Put a gate in the item frames. Now it looks like cabinet drawers with handles.

Another fun idea is a water cooler. Put down an iron block. Add a button to the front. Put a blue glass block on top.

Another nice decoration to add is bookcases, and that is something that already exists in Minecraft. You also may want to add a big table or some kitchen furniture.

Here’s a modern office, a bit sparse, with all the furniture together!

Check out our post on Kitchen Furniture for Minecraft and visit our Basic Minecraft for Kids page, too.

Hope you enjoyed these ideas for office furniture in Minecraft. Do you have any ideas to share?

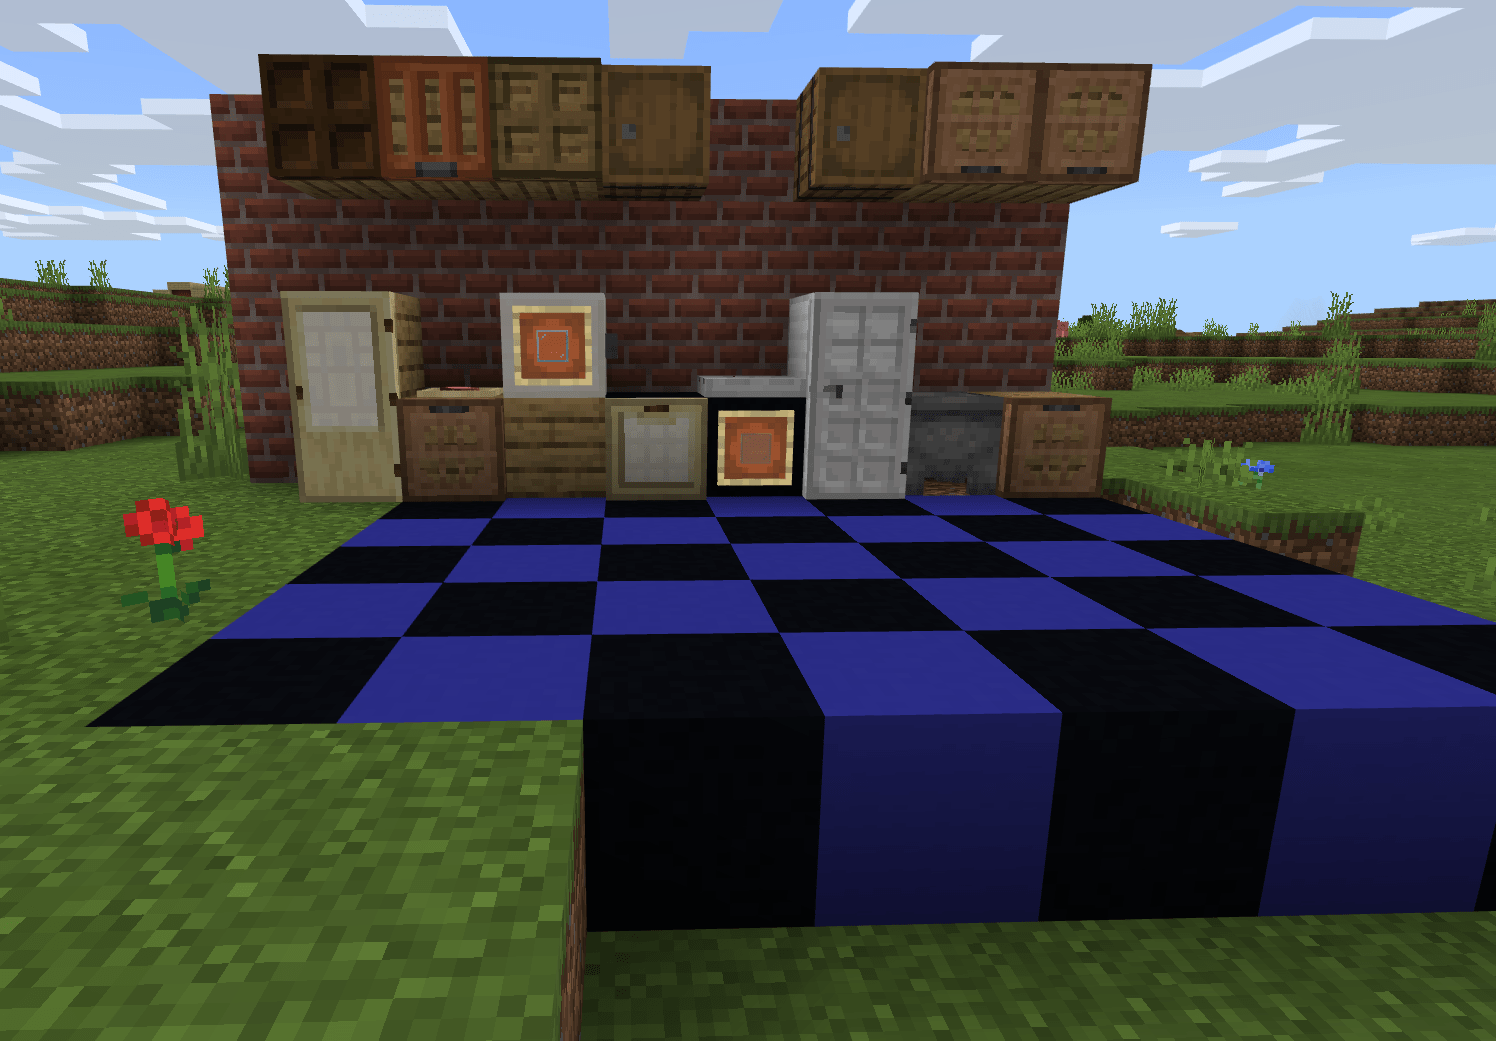
Easy Kitchen Furniture in Minecraft

Whether you build a cool house, castle, or tower in Minecraft, you need furniture and decorations to make it look nice. Here are some ideas for easy kitchen furniture in Minecraft. You can put them in your house or restaurant or even an office building setting (and click here for ideas for office furniture in Minecraft too)!

Share your best furniture ideas in the comments or show how you used my ideas here!

Kitchen Chair

Armchair with one stair and two signs on each side.

An easy way to make a chair is to use a stair.
You can also put two chairs next to each other. It looks like a couch.

Or make an armchair. Put down a stair with a stair. Put two signs on the sides of the char. Don’t write anything on the signs.

4 stairs in back, then one stair facing left and one stair facing right.

You can even make a big couch. Put 4 stairs next to each other. Put 2 stairs on the ends. One stair faces left. One faces right. You can make this very big if you want. This is probably better for a living room, but it can still be fun to do in a big kitchen!

You can even put a slab or carpets in the middle to make it a deep couch.

Here’s a cool idea for a chair I just learned about from @SheepGG: Put a campfire down. Put out the fire with a shovel or a splash bottle of water. Now put a sign on the back. I’ll take a picture when I can.

Kitchen Table for Minecraft

Make a small table by putting a fence down (it will look like a stick). Put a carpet on top.

To make a big table, put fences down. Put carpets on top of all the fences.
If you choose brown carpet, it looks like wood. If you choose another color, it looks like a table cloth. Put small chairs around the table if you want.

Another easy way to make a table is to use a scaffolding.

Refrigerator in Minecraft

A refridgerator is a key piece of kitchen furniture! Put down an iron door.
Put an iron block behind the door. The iron block should touch the door.
If it doesn’t touch the iron door, put it on the other side of the door.
Put another iron block on top of that block.

You can put a button on the side of the iron. This will make the door open and close!


Check out our latest Minecraft blog posts!


Kitchen Cabinets in Minecraft

To make cabinets you need to make a wall.
Then you can put blocks on the bottom of the wall and also at the top. Some blocks can be cabinets. Some can be counters.

Barrels make nice kitchen cabinets or use wood and put trapdoors on them. Try different kinds of trapdoors.
See what looks good to you. Don’t be afraid to mix and match
If you want a big cabinet or closet, you can put a door on it.

Microwave


Put a block of quartz down on the counter! Now put an item frame on the quartz.
Put a glass pane on the item frame. Now put a button on the front.

Cutting Board

Put an item frame on a block. Put a piece of food in the item frame. This works with apples, meat, fish, any food really. You can also try this trick on tables. Put an item frame down and then some food, even soup. It looks like there’s food on a placement on the table!

Dishwasher

Dishwasher on left, Oven/Stove on right

Put a block of quartz or iron or black concrete down.
Put a birch trapdoor the bottom part.

Oven and Stove

Put a block of quartz or iron or black concrete down. Put an iron trapdoor on top. This is the stove.
Put an item frame on the front. Put a piece of glass in the item frame. This is the oven.

Sink

A cauldron makes a good sink.

Put it all together to make a kitchen. Don’t forget a floor. Here I’ve done a checkered floor. Feel free to get more creative than I have.

Outdoor kitchen!

Do you have any cool ideas for kitchen furniture in Minecraft? Share them in the comments.

Disclaimer: Some of these ideas I borrowed from various places online such as video tutorials or other how-to tutorials Sometimes I had an idea that many people also had. I may have adapted or changed the idea, or gotten some ideas to improve my creation from tutorials. However, I only present ideas here that I have either adapted or seen used in many other tutorials.